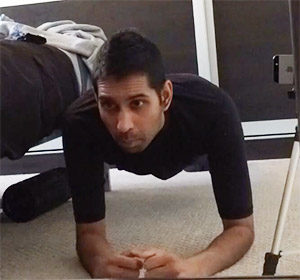
- Lie face down on the floor resting on your forearms.
- Push off the floor and raise up onto your toes while resting on your elbows & forearms.
- When you can no longer hold this position, return back to the starting position.
What is the Plank Exercise
So, what is the plank exercise? Well, in a nutshell it's a strength training exercise which is all about maintaining a fixed position for an extended period of time.
One of the key advantages of the plank exercise is that it helps in developing a strong stable lower back by strengthening your transversus abdominus muscles also known as as your core six-pack group.
Benefits And Muscles Worked
Strength
It is a strength training exercise so one of the key benefits is obviously to improve your strength in various areas. Let's take a closer look at the actual exercise.

If we start at the front, the first muscle being worked is your neck. In order to hold this plank position correctly you must keep your neck straight and not bending down. By keeping it straight you are working major muscle groups in your neck called the traps, this helps your posture especially if you spend a lot of time sitting at your desk as it helps support your neck.
Moving along the neck, the next muscle group you will notice being used are your shoulders.
Unless you go to the gym, shoulder muscles are generally not directly trained unless you do press ups for example.
If you are a fan of press ups, which many are, performing the plank will also strengthen your shoulder muscles over time and thus improving the performance of your press ups as it uses similar muscle groups.
Holding the shoulders up are the biceps. If you are not into body building and building your biceps, merely performing the plank will help build and tonne your biceps as you are using your biceps to keep your upper body weight off the ground.

Right so that covers your upper body workout. Now if we travel along under the body, the next muscle group we hit is your chest, although I would say this is a secondary muscle group that is worked.
If we continue along we then come to the major muscle group being worked, the abs. Strong abs are vital not only for sport but also for good posture while sitting at your desk. This exercise will also strengthen your abs and as a result tonne them giving them a much more streamline look.
The muscle groups to the opposite side of the abs are your lower back muscles. These too play a vital role in keeping you in the plank position which will strengthen with time if your lower back has become weak.
Moving along, the next muscle group we come to are the ones located in your bottom, yes these too are strengthen! From there you have the thighs and finally the calf muscles.
We got there in the end! So as you can see, the plank provides strength benefits to many muscle groups all at the same time. Let's continue ...
MentalThe plank exercise can be quite addictive so on the plus side it will help you wanting to try and improve on your previous performance. The plank requires focus in order to keep holding the plank for as long as possible, hence, I've found it mentally builds on my concentration skills while trying to achieve a goal.
As you are probably aware by now, holding the plank position stretches many muscle groups all at the same time. These muscle groups can get stressed during the day when sitting at your desk, however to release the tension from them, holding a plank position can be the ideal solution to help relieve these tense muscles.
Another great thing this exercise provides is good habit and training for your abs. This will help you daily if you are doing any physical activities or sports as you will automatically initially start tensing your abs before carrying out your activity. This is a great habit to develop as your tense abs provide additional strength and balance in your activity, not only that but also greatly protects you from injury, especially injury to your lower back.
AestheticPerforming the plank certainly helps in streamlining your waist line, however that doesn't mean its all you have to do to see results. Like with any form of exercise, you will still need to have consistency, a balanced diet and carryout other forms of cardio vascular exercise to complement your plank exercise for the best results.
Plank Drawbacks
Let's now talk about some of the drawbacks when the plank is performed incorrectly and some pointers on technique and form to get the most from this exercise.
The plank can impact on your lower back if you are performing it incorrectly with poor form. If you continue to do this then it will eventually have a negative effect in the lower back.
Technique And Alignment
A quick way to know if you are doing the plank exercise correctly is to glance under and to see your position (difficult to see if you are wearing a baggy t-shirt).

If you see a clear view to your feet in a straight line, chances are its correct. You can also perform it in front of the mirror to help you which is what I often do.
The following are the key reasons you may be experiencing back pain from performing the front plank exercise:
1. Pelvis tilted too far forward (arched back)
As you can see above, the hips and stomach is sagging down towards the ground. This is often due to poor form which creates a significant arch in the lower back putting un-natural pressure on your spine. Your core muscles aren't even being used in this position and your vertebrae and spinal ligaments are being over worked. This defies the purpose of the plank!
2. Chest too low to the ground (rounded back & hunched shoulders)
Here the chest is dropping too much towards the floor instead of being kept upright. The shoulders will also feel hunched as a result adding extra pressure to your shoulder blades.
3. Hips too high (butt in the air)
The Correct Plank
The correct way to perform the plank is to keep your back 'flat', engage your abs, glutes, quads and chest to help you maintain a straight line from your head to your feet:
Plank Variations
First aim to hold the plank for at least 30 seconds. During this time focus on your technique and form. Once you have got the hang of this then aim to hold this static hold for 60 seconds.
You should notice an improvement in your core strength by approaching the plank in this way and once 60 seconds has been achieved you are ready to add additional resistance to challenge your core muscle groups further.
Forearm Plank On Knees
When first starting out on doing the plank, I would suggest you start with doing the plank with your knees on the floor. This will teach you how to develop the right form without risking injury to your back.
Once you are able to perform this with ease you can switch to performing the full front plank.
Plank with Leg Lifts
- Start in the plank position
- slowly reach one arm out until your elbow is straight.
- Bring arm back and stabilise. Then do the sam again with the opposite arm.
Plank walk down
- Start in the plank position but with your elbows and arms straight , not bent. I.e. push-up position.
- Put one arm down slowly into standard plank position with the other arm following.
- Now you are in plank position.
- Raise yourself using one arm and the. Use the other arm to put you back into push-up position
Side Plank Exercise
The concepts for the side plank are very similar to the standard plank exercise.
The only difference is that the side plank puts the emphasis on your side muscle groups known as your obliques.
You will find the side plank a little more challenging as you are placing most of your body weight on one arm. But by tensing your abs In this position your are strengthening additional Core muscle groups used to stabilise your Lower back.
- Lay on your side with elbow on the floor under the shoulder.
- Slowly Lift up on that elbow, keeping the body stiff from head to toe and legs straight.
- When you can no longer hold this position, return back to the start position.
- Start slowly and try and aim for 5 to 10 seconds initially as you start.
Side Plank Common Mistakes
Torso not at 90 degrees to the GroundWhen in the side plank position ensure your shoulders are on top of each other and that your toros is maintained to a 90 degree angle to the ground.
Hips SagIf your hips are sagging then your core isn’t strong enough to keep your spine straight. Tense your core tight and keep your hips up. In time these muscle groups will become stronger to prevent this. Imagine an imaginary line travelling straight from your toes to your head while in this position to help you.
Not Tensing Your Glutes and QuadsTensing your glutes and quads will help you maintain a 90 degree angle and prevent your hips from sagging.
Side Plank Variations
The side plank requires good shoulder stability. Without it you will find the side plank difficult to do. Once you have achieved good form and stability with the side plank, only then you should move onto more advanced side plank variations to add additional resistance to your core strength.
Side Plank with Knees Bent
Depending on your strength, you may want to perform the side plank with your knees bent on the floor initially until your strength gradually improves.
- Lie on your side with your elbow on the floor sitting under your shoulder.
- Bend your knees at 90 degrees and put your feet on top of each other.
- Put your other hand on your hip.
- Push your hips up so there’s a straight line, tense your abs, glutes and quads.
- Maintain this hold for a few seconds. Repeat on opposite side.
Side plank
- Lie on your side with your bottom hand on the ground underneath your shoulder.
- Position your top foot on the ground in front of your bottom foot.
- Place your top hand on your hip.
- Drive your hips up to form a straight line with your body from head to toe.
- Tighten your abs, glutes and quads.
- Hold this position. Repeat on your opposite side.
Side plank with leg lift
- Get into the side plank position.
- Put your feet On top of each other and your hand by your side.
- Push your hips up to form a straight line from your feet to your head.
- Tense your abs, glutes and quads.
- Raise your top leg into the air while in plank position.
- Hold. Do the same on the opposite side.
A little story how the Plank helped my back pain weeks before a long haul flight
I will now give you a little story of how the plank came to my rescue following an injury when I was due to take a long haul flight. Continue reading if you want to hear about how the plank was used in context for fixing my lower back.
A Little BackgroundThe flights had been booked for over three months, the date for flying was approximately 5 weeks away, my wife and I were getting very excited as this was our first holiday together with our 3 year old son.
However, the excitement of the holiday soon brought a dull cloud over me when i suddenly injured my lower back at the gym which prevented me from standing or sitting without feeling discomfort or severe pain.
I started to panic, 'How will I sit on a cramped plane?', 'I'm 6ft tall, there's no way I can manage a long-haul flight!'.
I soon got on to google and looked up the nearest physiotherapy clinic and booked myself in. "So how can I help you" asked the physiotherapist. "I'm flying to Singapore in 5 weeks time, I've injured my lower back and I'm dreading the flight, can you fix me in time?".
Road To RecoveryAfter the initial one hour assessment, I was prescribed a treatment plan which consisted of two 30 minute visits each week where the physiotherapist applied massage, stretches and heat therapy to help heal the various injured areas.
Towards the final week, full body movement was restored, however, I still didn't feel confident that I would be able to manage the flight or carry all the bags due to the back muscles feeling very weak from the lack of resistance training which had been postponed during the healing and recovery phase.
Enter the plank! For the final week leading up to the departure date, I was prescribed strengthening exercises which consisted of performing the front plank and side plank exercises daily as these would help strengthen the lower back.

My Morning Routine
Therefore, on doctors orders, I got started with my plank regime. Each morning I would wake up and the first thing I would do is the try and hold the front plank. I would initially aim for 10 seconds, however this would gradually increase to 30, 40 & 60 seconds are my lower back became stronger and better supported.
I also performed the side plank as these muscles work in conjunction with the lower back and used the same approach of starting with a 10 second hold and gradually increased this as it became easier to perform.
D-Day ArrivedThe departure day finally arrived and I was as good as I could be to manage the long journey ahead. I was able to carry the luggage and was able to enjoy the flight without too much pain or discomfort thanks to the treatment plan prescribed by the physiotherapist.
The plank exercise is a great way to get started for strengthening the core muscle groups. However please seek advice from a medical professional first in-order to avoid injury and keep in mind the following 3 pointers:
1. Ensure the pelvis isn't tilted too far forward. 2. Ensure the Chest isn't too low towards the ground. 3. Ensure the Hips are not too high in the air.